
This is Part 3 in the series: Linux on STM32MP135. See other articles.
In this article, we use Arm Trusted Firmware (TF-A) to load the Linux kernel directly, without using U-Boot.[1] I have seen the idea of omitting the Secondary Program Loader (SPL) referred to as “falcon mode”, since it makes the boot process (slightly) faster. However, I am primarily interested in it as a way of reducing overall complexity of the software stack.
In this article, we will implement this in two ways. First, we modify the files as needed manually. At the end of the article, we provide an alternative method: directly integrate the changes into Buildroot.
To get started, make sure to have built the default configuration as per the first article of this series. Very briefly, this entails cloning the official Buildroot repository, selecting a defconfig, and compiling:
$ git clone https://gitlab.com/buildroot.org/buildroot.git --depth=1
$ cd buildroot
$ make stm32mp135f_dk_defconfig
$ make menuconfig # add the STM32MP_USB_PROGRAMMER=1 flag to TF-A build
$ make
It is also recommended to learn how to flash the SD card without removing it via a USB connection, as explained in the second article.
The procedure is pretty simple. All we need to do is to modify some files, adjust some build parameters, recompile, and the new SD card image is ready to test.
Before making any modifications, make a backup of the file containing U-Boot.
$ cd output/images
$ cp fip.bin fip_uboot.bin
Double check that the above fip.bin was built using the additional ATF
build variable STM32MP_USB_PROGRAMMER=1, otherwise USB flashing will not
work!
Open flash.tsv, and update the fip.bin to fip_uboot.bin there as well.
(Despite removing U-Boot from the boot process, we are still going to use it to flash the SD card image via USB using the STM32CubeProg.)
Two TF-A files need to be modified, so navigate to the TF-A build directory:
$ cd ../build/arm-trusted-firmware-lts-v2.10.5
Since the kernel is much bigger than U-Boot, it takes longer to load. We need
to adjust the SD card reading timeout. In drivers/st/mmc/stm32_sdmmc2.c,
find the line
timeout = timeout_init_us(TIMEOUT_US_1_S);
and replace it with
timeout = timeout_init_us(TIMEOUT_US_1_S * 5);
Next, we would like to load the kernel deep enough into the memory space so
that relocation of the compressed image is not necessary. In file
plat/st/stm32mp1/stm32mp1_def.h, find the line
#define STM32MP_BL33_BASE STM32MP_DDR_BASE
and replace it with
#define STM32MP_BL33_BASE (STM32MP_DDR_BASE + U(0x2008000))
Finally, in order to allow loading such a big BL33 as the kernel image, we
adjust the max size. In the same file, find the line
#define STM32MP_BL33_MAX_SIZE U(0x400000)
and replace it with
#define STM32MP_BL33_MAX_SIZE U(0x3FF8000)
Next, we need to modify a couple build parameters. Open the make menuconfig
and navigate to Bootloaders ---> ARM Trusted Firmware (ATF).
Under BL33, change from U-Boot to None.
Under Additional ATF build variables, make sure that U-Boot is not
present and add the following key-value pairs:
BL33=$(BINARIES_DIR)/zImage BL33_CFG=$(BINARIES_DIR)/stm32mp135f-dk.dtb
Select “Ok” and “Esc” out of the menus, making sure to save the new configuration.
Next, open the file
board/stmicroelectronics/common/stm32mp1xx/genimage.cfg.template and
increase the size of the fip partition, for example:
partition fip {
	image = "fip.bin"
	size = 8M
}
Finally, since U-Boot will no longer be around to pass the Linux command line
arguments, we can instead pass them through the device tree source. Open the
file output/build/linux-6.12.22/arch/arm/boot/dts/st/stm32mp135f-dk.dts
(you may have a different Linux version, just modify the path as appropriate)
and add the bootargs into the chosen section, as follows:
chosen {
	stdout-path = "serial0:115200n8";
	bootargs = "root=/dev/mmcblk0p4 rootwait";
};
Now we can rebuild the TF-A, the device tree blob, and regenerate the SD card image. Thanks to the magic of Buildroot, all it takes is:
$ make linux-rebuild
$ make arm-trusted-firmware-rebuild
$ make
Keep in mind that rebuilding TF-A is needed any time the Linux kernel or DTS
or TF-A sources change, since the kernel gets packaged into the fip by the
TF-A build process. In this case, the first make rebuilds the DTB, the
second packages it in the fip, and the third makes sure it gets into the SD
card.
Set DIP switch to serial boot (press in the upper all of all rockers) and flash to SD card:
$ sudo ~/cube/bin/STM32_Programmer_CLI -c port=usb1 -w output/images/flash.tsv
Then reconfigure the DIP switches for SD card boot (press the bottom side of the second rocker switch from the left), and press the black reboot button.
If you watch the serial monitor carefully, you will notice that we transition from TF-A directly to OP-TEE and Linux. Success! No U-Boot in the boot process:
NOTICE:  Model: STMicroelectronics STM32MP135F-DK Discovery Board
NOTICE:  Board: MB1635 Var1.0 Rev.E-02
NOTICE:  BL2: v2.10.5(release):lts-v2.10.5
NOTICE:  BL2: Built : 20:58:52, Sep 10 2025
NOTICE:  BL2: Booting BL32
I/TC: Early console on UART#4
I/TC:
I/TC: Embedded DTB found
I/TC: OP-TEE version: Unknown_4.3 (gcc version 14.3.0 (Buildroot 2025.08-rc3-87-gbbb0164de0)) #1 Thu Sep  4 03:06:46 UTC 2025 arm
...
(more OP-TEE messages here)
...
[    0.000000] Booting Linux on physical CPU 0x0
[    0.000000] Linux version 6.12.22 (jk@Lutien) (arm-buildroot-linux-gnueabihf-gcc.br_real (Buildroot 2025.08-rc3-87-gbbb0164de0) 14.3.0, GNU ld (GNU Binutils) 2.43.1) #1 SMP PREEMPT Wed Sep  3 20:23:46 PDT 2025
[    0.000000] CPU: ARMv7 Processor [410fc075] revision 5 (ARMv7), cr=10c5387d
Instead of following the above instructions, we can automate the build process
by integrating it into Buildroot. To this end, I provide the GitHub repository
stm32mp135_simple that can be
used as follows.
Clone the Buildroot repository. To make the procedure reproducible, let’s start from a fixed commit (latest at the time of this writing):
$ git clone https://gitlab.com/buildroot.org/buildroot.git
$ cd buildroot
$ git checkout 5b6b80bfc5237ab4f4e35c081fdac1376efdd396
Obtain this repository with the patches we need. Copy the defconfig and the board-specific files into the Buildroot tree.
$ git clone git@github.com:js216/stm32mp135_simple.git
$ cd buildroot # NOT stm32mp135_simple
$ git apply ../stm32mp135_simple/patches/add_falcon.patch
$ git apply ../stm32mp135_simple/patches/increase_fip.patch
$ cp ../configs/stm32mp135_simple/stm32mp135f_dk_falcon_defconfig configs
$ cp -r ../board/stm32mp135_simple/stm32mp135f-dk-falcon board/stmicroelectronics
Build as usual, but using the new defconfig:
$ make stm32mp135f_dk_falcon_defconfig
$ make
Flash to the SD card and boot into the new system. You should reach the login prompt exactly as in the default configuration—but without involving U-Boot
To port the “default” STM32MP135 setup[2] to a new board design, one is expected to be comfortable writing and modifying the drivers and device tree sources that work with
That is a tall order for a new embedded developer trying to get started integrating Linux in their products. To make things worse, there is at present almost no literature to be found suggesting that a simpler, saner method exists. Certainly the chip vendors themselves do not encourage it.[3]
With this article, we have began chipping away at the unnecessary complexity. We have removed U-Boot from the boot chain. (We still use it for copying the SD card image via USB. One thing at a time!) Since our goal is to run Linux, the list above gives us a blueprint for the work that remains to be done: get rid of everything that is not Linux.
The software that you do not run is software you do not have to understand, test, debug, maintain, and be responsible for when it breaks down ten years down the line in some deeply embedded application, perhaps in outer space.
19/12/2024: original Buildroot mailing list submission (1/1)
16/12/2025: response by Arnout Vandecappelle (link)
17/9/2025: amended submission (v2 0/2, 1/2, 2/2)
This approach is inspired by the ST wiki article How to optimize the boot time, under “Optimizing boot-time by removing U-Boot”. (cited 09/11/2025) ↩︎
See the ST Wiki, OpenSTLinux distribution (cited 09/11/2025) ↩︎
As per the ST forum, (cited 09/11/2025) the approach outlined in the present article is officially not supported by ST. ↩︎

The SDK[1] drivers provided by NXP for use on the Kinetis K64 platform are extensive, well-tested and … not perfect. This article shows three bugs found in the ethernet driver. Note that none of this is original content; I merely put it together here for my future reference.
I have only seen this bug happen once in two years and have not found a way to reproduce it at will. So the analysis below may or may not be correct.
The symptom was that the firmware froze upon triggering the assertion in
lwip/port/enet_ethernetif_kinetis.c:
“Buffer returned by
ENET_GetRxFrame()doesn’t match any RX buffer descriptor”
After some Googling I found this forum
thread,
which suggests, in a roundabout way, that there is a missing check in
fsl_enet.c. We have to add following to ENET_GetRxFrame():
if (curBuffDescrip->length == 0U)
{
    /* Set LAST bit manually to let following drop error frame
       operation drop this abnormal BD.
    */
    curBuffDescrip->control |= ENET_BUFFDESCRIPTOR_RX_LAST_MASK;
    result = kStatus_ENET_RxFrameError;
    break;
}
The NXP engineer on the forum explains: “I didn’t use this logic because I never meet this corner case and consider it a redundant operation.” I was curious if this “corner case” every happens, so I added a breakpoint, which got triggered after about two days of constant testing.
ChatGPT seems to think this check is necessary (but then again, I seem to be able to convince it of just about anything I do or do not believe in):
If you omit the check and DMA ever delivers a BD with
length == 0: Your code will think it’s still in the middle of assembling a frame. It will not see theLASTbit yet, so it will happily advance to the next BD. That means the logic walks into an inconsistent state:rxBuffermay point to nothing, yourrxFramebookkeeping goes out of sync, and later you’ll crash on a buffer underrun, invalid pointer, or corrupted frame queue.
It remains to be seen if this check was behind my original crash, and if the body of the if statement is appropriate to handle the condition of unexpected zero-length buffer descriptor.
Credit: User pjanco first reported the error, while AbnerWang posted the solution. [source]
In fsl_enet.c, the function ENET_GetRxFrame() tries to deallocate the
pointer of the receive buffer:
while (index-- != 0U)
{
    handle->rxBuffFree(base, &rxFrame->rxBuffArray[index].buffer,
        handle->userData, ringId);
}
First need to unpack some definitions to understand what the above means.
If we dig into the rxBuffFree() function, we discover it in the file
lwip/port/enet_ethernetif_kinetis.c. The buffer to be deallocated is passed
as a pointer void * buffer, and freed
int idx = ((rx_buffer_t *)buffer) - ethernetif->RxDataBuff;
ethernetif->RxPbufs[idx].buffer_used = false;
Next, what are rxFrame and rxBuffArray? The first one is of type
enet_rx_frame_struct_t, which is defined in fsl_enet.h:
typedef struct _enet_rx_frame_struct
{
    enet_buffer_struct_t *rxBuffArray;
    ...
} enet_rx_frame_struct_t;
This allows us to see what is the type of rxBuffArray:
typedef struct _enet_buffer_struct
{
    void *buffer;
    uint16_t length;
} enet_buffer_struct_t;
Finally, what is ethernetif->RxDataBuff? We find it declared in
lwip/port/enet_ethernetif_kinetis.c as the static array in the function
ethernetif0_init():
SDK_ALIGN(static rx_buffer_t rxDataBuff_0[ENET_RXBUFF_NUM],
    FSL_ENET_BUFF_ALIGNMENT);
ethernetif_0.RxDataBuff = &(rxDataBuff_0[0]);
More precisely, RxDataBuff is a pointer to the first element of this array.
This pointer therefore has the type rx_buffer_t*.
That type itself is declared at the top of the same file as an aligned
version of a uint8_t buffer:
typedef uint8_t rx_buffer_t[SDK_SIZEALIGN(ENET_RXBUFF_SIZE,
    FSL_ENET_BUFF_ALIGNMENT)];
Now we can take a step back and think whether the idx calculation would be
best done with the buffer itself, or a pointer to it. The calculation subtracts
the following:
rxFrame->rxBuffArray[index].buffer, of type void*, is a pointer to the
memory location that stores the ethernet frame.
ethernetif->RxDataBuff, of type rx_buffer_t*
The corrected code should pass the buffer pointer stored in .buffer, not the
address of the .buffer field (omit the &):
handle->rxBuffFree(base, rxFrame->rxBuffArray[index].buffer,
    handle->userData, ringId);
Credit: This bug was found by KC on 7/31/2024.
Another bug in ethernetif0_init() in enet_ethernetif_kinetis.c: the ethernet
buffer descriptor structs are declared static:
AT_NONCACHEABLE_SECTION_ALIGN(
    static enet_rx_bd_struct_t rxBuffDescrip_0[ENET_RXBD_NUM],
    FSL_ENET_BUFF_ALIGNMENT);
AT_NONCACHEABLE_SECTION_ALIGN(
    static enet_tx_bd_struct_t txBuffDescrip_0[ENET_TXBD_NUM],
    FSL_ENET_BUFF_ALIGNMENT);
The assumption is that since they are declared static, the descriptors will be
zero-initialized at system startup. However, the macro
AT_NONCACHEABLE_SECTION_ALIGN potentially places these descriptor in a special
section that can bypass the zero-initialization, depending on the startup code
and linker script.
In that case, we need to manually zero out these buffers. I put the following at
the top of ethernetif_enet_init() in enet_ethernetif_kinetis.c:
// Buffer descriptors must be initialized to zero
memset(ðernetif->RxBuffDescrip[0], 0x00, ENET_RXBD_NUM*sizeof(ethernetif->RxBuffDescrip[0]));
memset(ðernetif->TxBuffDescrip[0], 0x00, ENET_TXBD_NUM*sizeof(ethernetif->TxBuffDescrip[0]));
Credit: This bug was also found by KC.
I am using SDK version 2.11.0 for the MK64FN1M0xxx12. ↩︎

This is Part 2 in the series: Linux on STM32MP135. See other articles.
In the previous article, we built a Linux kernel and manually copied it to an SD card. This works for a first test, but quickly becomes annoying. Here, we show how to use the STM32CubeProg to flash the SD card without removing it from the evaluation board.
Note: You may find the extensive explanations in the Bootlin article about flashing a similar chip helpful.
Finish the build process as per the previous
article, so as to have at least the
following files under buildroot/output/images/:
tf-a-stm32mp135f-dk.stm32fip.binu-boot-nodtb.binsdcard.imgGo to the ST website to download the STM32CubeProg. This unfortunately requires a registration and sign-up.
Get the Linux version, unpack in a new directory, and run the installer (just follow its verbose prompts):
$ cd cubeprog
$ unzip ../stm32cubeprg-lin-v2-20-0.zip
$ ./SetupSTM32CubeProgrammer-2.20.0.linux
Now plug in all three USB cables for the board. Set the DIP boot switches for serial boot (press in all the upper parts of the white rocker switches). Press the black reset button. If everything worked, you should be able to see the board under your USB devices:
jk@Lutien:/var/www/articles$ lsusb
...
Bus 001 Device 114: ID 0483:3753 STMicroelectronics STLINK-V3
Bus 001 Device 012: ID 0483:df11 STMicroelectronics STM Device in DFU Mode
...
The STLINK-V3 is what you can use to monitor the flashing progress via UART.
Simply open a serial monitor:
sudo picocom -b 115200 /dev/ttyACM0
Run the STM32CubeProg from the location that you installed it in to check that it is able to detect the board:
$ sudo ~/cube/bin/STM32_Programmer_CLI -l usb
      -------------------------------------------------------------------
                        STM32CubeProgrammer v2.20.0
      -------------------------------------------------------------------

=====  DFU Interface   =====

Total number of available STM32 device in DFU mode: 1

  Device Index           : USB1
  USB Bus Number         : 001
  USB Address Number     : 002
  Product ID             : USB download gadget@Device ID /0x501, @Revision ID /0x1003, @Name /STM32MP135F Rev.Y,
  Serial number          : 002800423232511538303631
  Firmware version       : 0x0110
  Device ID              : 0x0501
If that worked, it’s time to prepare the images for flashing. Go to
buildroot/output/images and create a file flash.tsv with the following
contents:
#Opt	Id	Name	Type	IP	Offset	Binary
-	0x01	fsbl1-boot	Binary	none	0x0	tf-a-stm32mp135f-dk.stm32
-	0x03	fip_boot	Binary		none	0x0		fip.bin
-	0x03	ssbl-boot	Binary	none	0x0	u-boot-nodtb.bin
P	0x10	sdcard	RawImage	mmc0		0x0	sdcard.img
Finally, run the flashing command itself:
sudo ~/cube/bin/STM32_Programmer_CLI -c port=usb1 -w flash.tsv
The STM32CubeProg will go through the sequence of files you wrote into
flash.tsv. First, the Arm Trusted Firmware (TF-A) gets written to the
memory and executed. It then does some secure magic behind the scenes and
accepts the next payload via the DFU protocol, the U-Boot. At last, U-Boot
itself is executed and it in turn accepts the last payload: the SD card
itself. Which was, after all, the only thing you wanted to transfer anyway
…
The tutorial above again presents the simplest method I have found so far, with a minimum of steps and prerequisites, to flash the SD card of the eval board without taking the card in and out. What’s the issue?
The STM32CubeProg comes in a 291M zip file, which gets installed as a 1.5G program. We use it to copy a disk image to the SD card. See the problem yet? Or let’s consider the on-board procedure: TF-A (4,212 files and 506,952 lines of code according to cloc) is used to run U-Boot (21,632 files and 3,419,116 lines of code), just so that a semi-standard USB DFU protocol can expose the SD card to write the image.
But why??? ChatGPT explains:
U-Boot became the standard since vendors upstreamed support there, and it offers cross-platform flashing via DFU/fastboot for factories and Windows users who can’t
ddraw disks. It also doubles as the hook for A/B updates, rollback, and secure boot. In practice, this forces developers into a complex boot stack, even though most boards could just boot Linux directly from SD/eMMC and use a tiny DFU mass-storage tool for recovery.
A more likely explanation is that the boot process has acquired an unnecessary reputation for being difficult, so that few want to mess with it. If there is a working solution, it will get incorporated into the software stack, no matter how baroque. The warning has been around for a long time:
Big building-blocks […] can lead to more compact code and shorter development time. […] Less clear, however, is how to assess the loss of control and insight when the pile of system-supplied code gets so big that one no longer knows what’s going on underneath.
[… As] libraries, interfaces, and tools become more complicated, they become less understood and less controllable. When everything works, rich programming environments can be very productive, but when they fail, there is little recourse.[1]
All these tool are intended to make our work easier, but as they are piled on
without any reasonable limit, the resulting mess is ironically far more
complicated than the problem they are solving. If the task at hand is to flash
an SD card image, why doesn’t the firmware expose the medium as a USB mass
storage device, so that standard tools like dd could be used to work with it?
The cynical answer suggests itself … They didn’t know better.
Those who do not understand Unix are condemned to reinvent it, poorly.[2]
Surely it cannot be too difficult to write a simple “bare-metal” program, which we could load to the board using the simple and well-documented UART protocol implemented in the ROM of the STM32MP1. The program would be very small and quick to load. The program would expose the available media as mass storage devices, and that’s it.
But … You may object, we need U-Boot anyways, otherwise how are we to load Linux? As we will explain in a future article, that is not so. U-Boot is entirely unnecessary for a large class of embedded Unix applications.

Unix was built on a handful of ideas that turned out to be both powerful and practical. The following discussion blends established Unix facts with interpretive commentary; it does not claim to describe any single historical Unix precisely.
The shell runs commands as programs. There’s no special class of built-ins; if you want a new command, you write a program. By default, programs read from standard input and write to standard output, unless redirected.
Most commands are small filters for text streams. They do one job, and they work together naturally. Connecting them with pipes lets you build bigger tools out of simpler ones.
Everything is a file: user data, programs, directories, and even devices. Directories form a tree; each entry points to an inode, which knows where the data blocks live. Devices show up as files too.
This means that I/O and storage use the same calls: open, close, read, write. That’s the interface for everything. Executables and data files are stored in the same way, reinforcing the idea that a single abstraction suffices.
The kernel is deliberately small. It multiplexes I/O and leaves the rest to user programs. Even init, the first process, is just a program: it opens terminals, prints the login message, and starts shells in a loop.
Processes come from the fork/exec pair. One process copies itself, then overlays the copy with another program. The idea is simple, and it works.
System calls are invoked by a trap instruction, wrapped in library functions so programs don’t depend directly on kernel details. Programs stay independent, and the operating system can change underneath.
Unix was small enough that one person could understand the whole thing. That made it easier to modify, port, and teach. The manuals were short, consistent, and focused on usage, not internals. A second volume provided tutorials and background for those who wanted more.
The guiding principle was: be general, but not too general; portable, but not too portable. If you try to solve every problem in advance, you get bloat. By keeping it modest, Unix was more useful—and paradoxically more general and portable—than larger systems.
Some parts were machine-specific, usually device drivers or bits of assembly. But not many. Most code was reusable, and the exceptions were small. An array of function pointers mapped device numbers to driver routines; that was about as complex as it got. For example, a character device[1] driver needs to expose the following functions:
extern struct cdevsw
{
	int	(*d_open)();
	int	(*d_close)();
	int	(*d_read)();
	int	(*d_write)();
	int	(*d_ioctl)();
	int	(*d_stop)();
	struct tty *d_ttys;
} cdevsw[];
The 80/20 rule applied everywhere: make most of the system simple and portable, accept a little complexity when it really pays off. Code was meant to be 80% reusable, not 100%, which avoided the kind of rigidity seen in later systems.
Unix came with all its own sources and tools. It was self-hosting, and people could read, study, and change the code. The system included what you needed, and nothing more. No useless programs, no dead code, and very little irrelevant platform-specific clutter.
The philosophy was to write programs you would actually use, not ones meant to satisfy a standard or some hypothetical future need.
The enduring lesson of Unix is that simplicity beats complexity. Interfaces were orthogonal, text was the universal medium, and programs were small and self-contained. Each one did one thing, and did it well.
That philosophy proved more important than any single feature. It made Unix portable, teachable, and durable. It showed that you don’t need a committee or a grand design to build something powerful. You need clarity, restraint, and the discipline to write only what you need.
Unix also suggests how to go further. Small, portable, self-contained programs can approach the kind of stability that TeX achieved—systems so refined that they don’t need to change.
Portability itself can be modular. The Wollongong group[2] showed this by first porting Unix piece by piece to an Interdata 7/32, running it alongside the host system, and then replacing the host functions with assembly routines. That approach points toward kernels that are more modular, where pieces like fork and exec could be reused without bringing along a whole scheduler.
Device drivers can also be simplified. One idea is to treat them as user processes whose IDs match their device numbers. They would implement the usual open, read, and write interfaces, but otherwise behave like ordinary programs: start and stop freely, hold their own memory, receive signals. The kernel would not “manage” them, yet the familiar Unix file interface would still apply.
The same lesson holds today. Artificial intelligence can sometimes repair or adapt programs automatically, but only if the systems are small and self-contained. Large, tangled software offers no foothold. Unix worked because it avoided dead code, avoided over-abstraction, and made each interface simple enough to understand and replace.
Finally, Unix showed that the way forward can’t be too innovative. If “the way” is too radical, no one will follow it.[3] The genius of Unix was that it was just radical enough.
From version 7 Unix, found in
/usr/sys/h/conf.h. ↩︎
Juris Reinfelds: The First Port of Unix. Department of Computing Science, The University of Wollongong. See also Richard Miller: The First Unix Port. Miller Research Ltd. (Both documents undated. Why don’t people date all their documents!?) ↩︎
Still looking for the source of this quote … ↩︎

This is Part 1 in the series: Linux on STM32MP135. See other articles.
Wouldn’t it be great to have a single board computer that runs just Linux? That is, no external libraries, tools, driver modules—just the kernel binary, and whichever programs you choose to run under it. After all, Linux is just a C program, so how hard can it be to compile and run it? Read on to get started exploring the wild world of embedded Linux.
In this tutorial, we show how to get a basic “minimal” Linux installed on the STM32MP135 evaluation board with a minimum of steps or obscure scripts. For detailed explanations, refer to the excellent writeup from Bootlin.
Get a copy of Buildroot:
$ git clone https://gitlab.com/buildroot.org/buildroot.git
$ cd buildroot
As of this writing, the latest commit in this repository is
$ git rev-parse HEAD
bbb0164de08f761a3399c961700db44befff5c70
Find the default configuration appropriate for this board:
$ make list-defconfigs | grep stm32mp135
This shows that stm32mp135f_dk_defconfig is available. Install it by calling
make on it:
$ make stm32mp135f_dk_defconfig
Let’s enable the USB mode for Arm Trusted Firmware (TF-A) so that we will be able to use USB flashing in the future. Open
$ make menuconfig
Navigate under Bootloaders ---> ARM Trusted Firmware (ATF) and add the
following at the end of the “Additional ATF build variables” string:
STM32MP_USB_PROGRAMMER=1
Then select “OK”, and “Esc” your way out of the menuconfig. Make sure to say “Yes” when asked whether to save the new configuration.
Run the build, and collect logs into a file:
$ time make >log.txt 2>&1
On my dual-core i5-7300U laptop, this took about an hour and a half.
Watch the build from another terminal:
$ tail -f log.txt
Copy the generated image to an SD card (assumed to be at /dev/sdb):
$ sudo dd if=output/images/sdcard.img of=dev/sdb bs=1M
Time to run it on the evaluation board! Set it up as follows:
CN12, labelled PWR_IN)
to a powered USB hubCN10, left of the screen) to a desktop computer,
which will enumerate as a serial port (/dev/ttyACM0 on my computer).
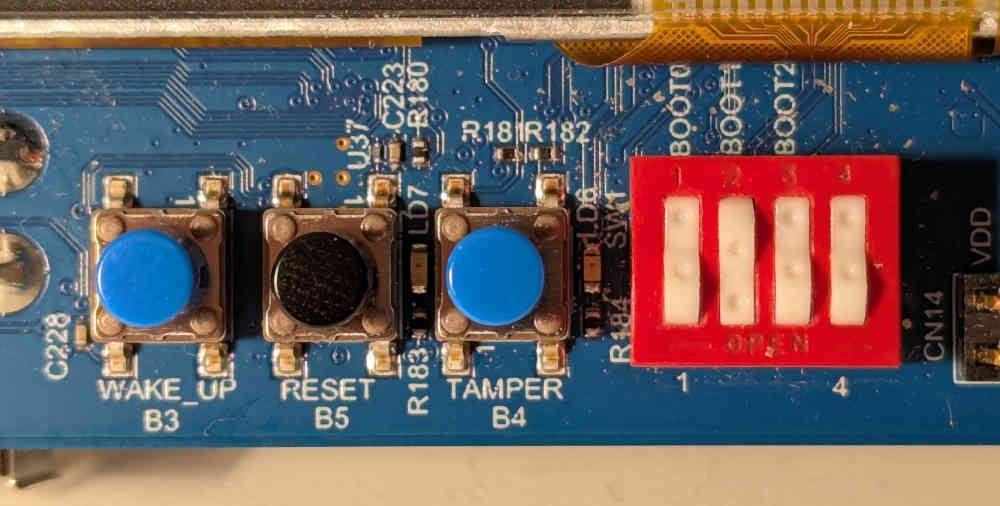
Set the DIP switches to boot from the SD card as shown in the image below. In
this orientation, press in on the upper side of the rockers of BOOT0 and
BOOT2, and on the lower side for BOOT1.
Press the black reset button and if everything went right, you should see the kernel boot messages displayed on the serial monitor, until the login prompt gets displayed. Done!
Welcome to Buildroot
buildroot login: root
# uname -a
Linux buildroot 6.12.22 #1 SMP PREEMPT Wed Sep  3 20:23:46 PDT 2025 armv7l GNU/Linux
This is, to my knowledge, the fastest way to get started with embedded Linux on
“real” hardware in terms of number of steps. However, it does not result in the
most minimal distribution. Besides the Linux kernel, the default configuration
pulls in a number of large programs, such as U-Boot, ATF, OP-TEE, and more.
(Examine buildroot/dl) after building to see all the stuff that got downloaded
in the build process.)
For someone used to bare-metal embedded work, the size and complexity of this auxiliary software is utterly baffling. A bootloader with more lines of code than my whole project? Several different compilers and interpreters (C, Rust, Perl, Python) needed for a “Hello, world!?”
In my mind I hold an ideal of the “pure” essence of Unix: there is one kernel,
which at the end of its boot process invokes one user-space program (init),
which then does anything it wants to. I believe in the simplicity of the Linux
boot process, as outlined by Russell King in the 2002 masterpiece, “Booting ARM
Linux”:
r2It is time we regain the pristine uncomplicated state that used to exist before everything became bundled and containerized and wrapped inside countless layers of abstraction that are supposed to make things simpler, but in the end serve only to confuse everyone.
In the next articles, we will take this “primordial mess” and cut it down to size. Stay tuned!