
This is Part 1 in the series: Linux on STM32MP135. See other articles.
Wouldn’t it be great to have a single board computer that runs just Linux? That is, no external libraries, tools, driver modules—just the kernel binary, and whichever programs you choose to run under it. After all, Linux is just a C program, so how hard can it be to compile and run it? Read on to get started exploring the wild world of embedded Linux.
In this tutorial, we show how to get a basic “minimal” Linux installed on the STM32MP135 evaluation board with a minimum of steps or obscure scripts. For detailed explanations, refer to the excellent writeup from Bootlin.
Get a copy of Buildroot:
   $ git clone https://gitlab.com/buildroot.org/buildroot.git
   $ cd buildroot
As of this writing, the latest commit in this repository is
   $ git rev-parse HEAD
   bbb0164de08f761a3399c961700db44befff5c70
Find the default configuration appropriate for this board:
$ make list-defconfigs | grep stm32mp135This shows that stm32mp135f_dk_defconfig is available. Install it by calling
make on it:
$ make stm32mp135f_dk_defconfigLet’s enable the USB mode for Arm Trusted Firmware (TF-A) so that we will be able to use USB flashing in the future. Open
$ make menuconfigNavigate under Bootloaders ---> ARM Trusted Firmware (ATF) and add the
following at the end of the “Additional ATF build variables” string:
STM32MP_USB_PROGRAMMER=1Then select “OK”, and “Esc” your way out of the menuconfig. Make sure to say “Yes” when asked whether to save the new configuration.
Run the build, and collect logs into a file:
$ time make >log.txt 2>&1On my dual-core i5-7300U laptop, this took about an hour and a half.
Watch the build from another terminal:
$ tail -f log.txtCopy the generated image to an SD card (assumed to be at /dev/sdb):
$ sudo dd if=output/images/sdcard.img of=dev/sdb bs=1MTime to run it on the evaluation board! Set it up as follows:
Insert the SD card into the slot
Connect the USB-C port to the right of the screen (CN12, labelled PWR_IN)
to a powered USB hub
Connect the Micro USB (CN10, left of the screen) to a desktop computer,
which will enumerate as a serial port (/dev/ttyACM0 on my computer).
Open a serial console (115200 baud, no parity) to listen

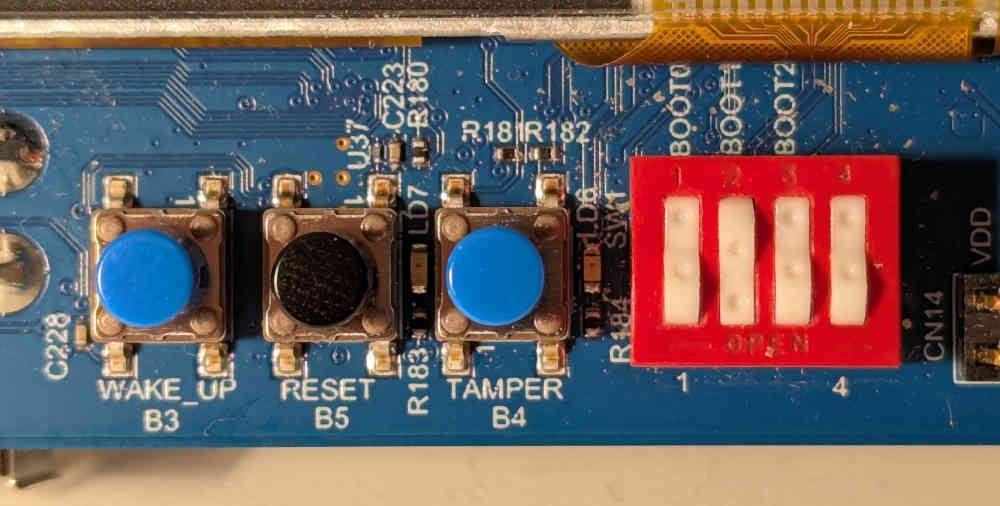
Set the DIP switches to boot from the SD card as shown in the image below. In
this orientation, press in on the upper side of the rockers of BOOT0 and
BOOT2, and on the lower side for BOOT1.
Press the black reset button and if everything went right, you should see the kernel boot messages displayed on the serial monitor, until the login prompt gets displayed. Done!
   Welcome to Buildroot
   buildroot login: root
   # uname -a
Linux buildroot 6.12.22 #1 SMP PREEMPT Wed Sep 3 20:23:46 PDT 2025 armv7l GNU/LinuxThis is, to my knowledge, the fastest way to get started with embedded Linux on
“real” hardware in terms of number of steps. However, it does not result in the
most minimal distribution. Besides the Linux kernel, the default configuration
pulls in a number of large programs, such as U-Boot, ATF, OP-TEE, and more.
(Examine buildroot/dl) after building to see all the stuff that got downloaded
in the build process.)
For someone used to bare-metal embedded work, the size and complexity of this auxiliary software is utterly baffling. A bootloader with more lines of code than my whole project? Several different compilers and interpreters (C, Rust, Perl, Python) needed for a “Hello, world!?”
In my mind I hold an ideal of the “pure” essence of Unix: there is one kernel,
which at the end of its boot process invokes one user-space program (init),
which then does anything it wants to. I believe in the simplicity of the Linux
boot process, as outlined by Russell King in the 2002 masterpiece, “Booting ARM
Linux”:
Initialize RAM and copy the kernel into it
Initialise one serial port
Load the device tree blob (DTB) into RAM, and place its address in r2
Pass control to Linux and watch it boot like magic!
It is time we regain the pristine uncomplicated state that used to exist before everything became bundled and containerized and wrapped inside countless layers of abstraction that are supposed to make things simpler, but in the end serve only to confuse everyone.
In the next articles, we will take this “primordial mess” and cut it down to size. Stay tuned!